SMALL SPACE GARDENING: Composting directly in the garden

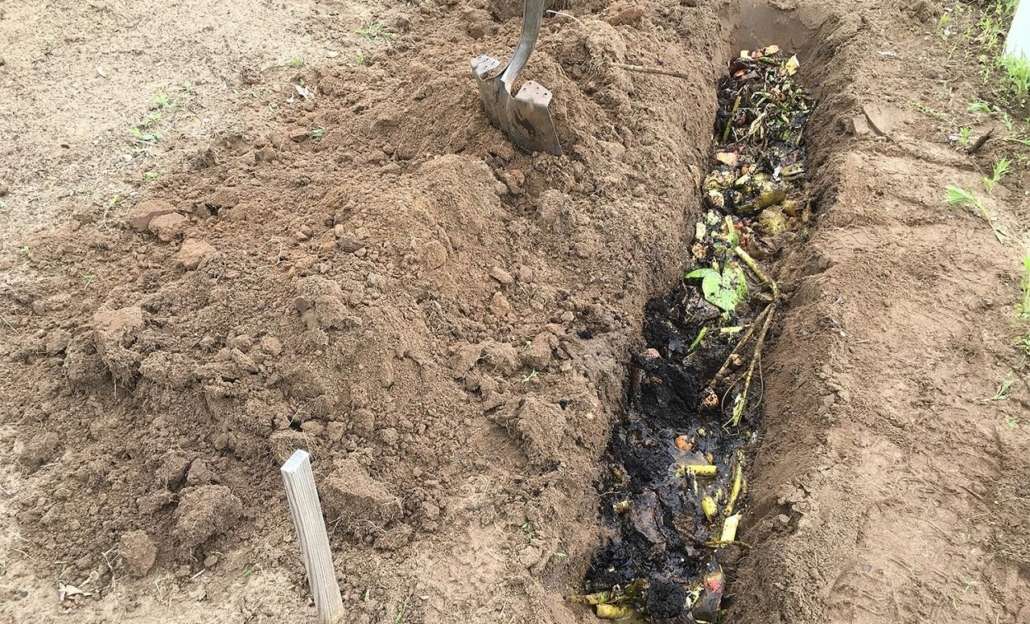
Trench composting, a centuries old technique, is low maintenance, effective, eliminates the need to turn piles of plant debris, requires minimal space, and doesn’t smell. (photo courtesy of MelindaMyers.com)

by Melinda Myers

Trench composting: An old tried and true method

Don’t toss those imperfect lettuce leaves, onion tops and strawberry tops into the trash. Instead, convert them into compost right in the garden.

Worm and pile composting are great ways to manage these scraps. But if these methods aren’t for you, try trench composting. This centuries old technique is low effort and effective. The process is basically invisible, eliminates the need to turn a pile of plant debris, requires minimal space and doesn’t smell.

Simply dig a 12-inch-deep trench between the rows of vegetables, in the pathway, or in any vacant spot in the garden. Be careful not to damage the plant roots. Add about four to six inches of kitchen scraps, mix with soil and cover with at least eight inches of soil that you removed from the hole. Co­vering with this much soil helps prevent animals from digging. Repeat until the trench is filled with plant debris and covered in soil.

Just like other composting methods, use plant-based materials only. Do not add meat, dairy and fat that can attract animals and rodents. And this is no place for perennial weeds like quackgrass, annual weeds gone to seed, or invasive plants that can survive the composting and take over the garden.

You can also trench compost one hole at a time. Just dig a hole in a vacant space in the garden, toss in the materials, mix, and cover with soil. I grew up with this method. After dinner or once we had a bowl full of kitchen scraps, we were sent to the garden to dig a hole, dump, and cover.

For those that want to rotate plantings as well as compost, you may want to try one of these two methods. Plant in wide rows and trench compost in the pathway. Next year, move the garden to the path location and make last year’s garden the path. You will be rotating your plantings while improving the soil.

Or designate separate adjacent areas for planting, paths, and composting. Next year, rotate so last year’s composting area becomes garden, the garden becomes the path, and the path is the new section for trench composting. In three years, you will have rotated crops and improved the soil in all three areas.

Start by contacting your local municipality to make sure there are no restrictions on any type of composting. Then get out the shovel and dig your way to healthier soil and a more productive garden.

Melinda Myers has written more than 20 gardening books, including the recently released Midwest Gardener’s Handbook, 2nd Edition and Small Space Gardening. She hosts The Great Courses “How to Grow Anything” DVD instant video series and the nationally syndicated Melinda’s Garden Moment TV & radio program. Myers is a columnist and contributing editor for Birds & Blooms magazine and her website is www.MelindaMyers.com.

SMALL SPACE GARDENING: Harvesting red and green tomatoes

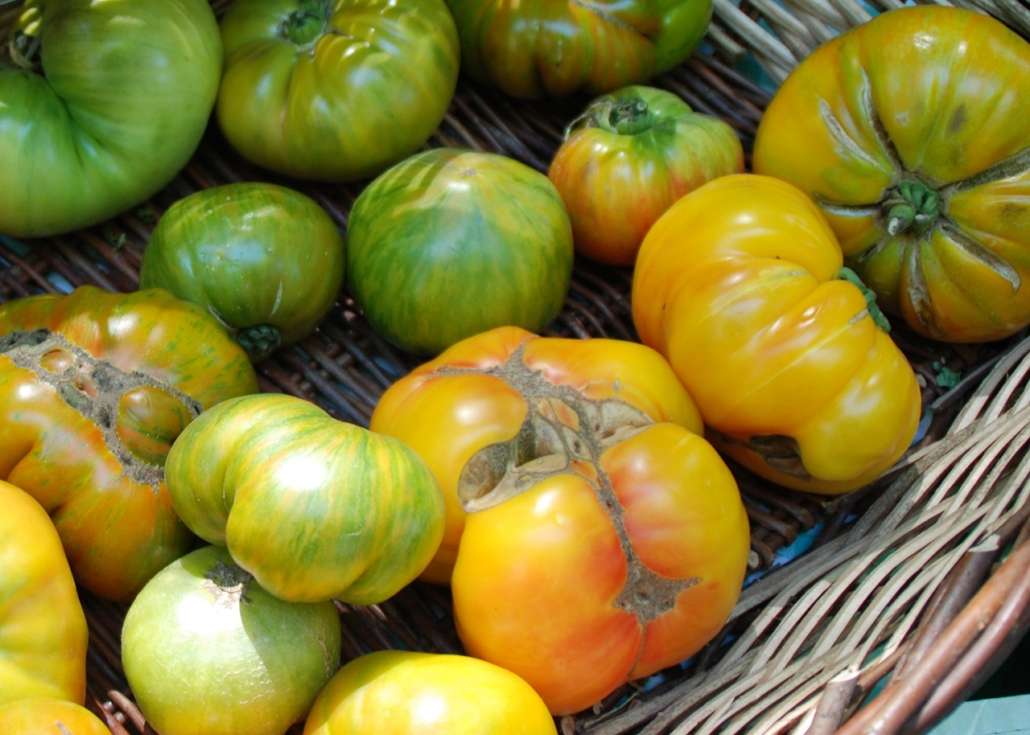
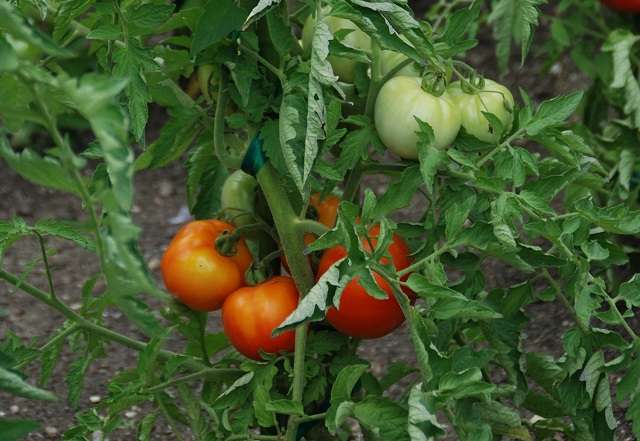
‘Tye Dye’ tomato in the garden with red and green tomatoes to harvest. (photo courtesy of
MelindaMyers.com)

by Melinda Myers

Nothing beats the flavor of fresh-from-the-garden tomatoes. Harvesting when they are fully ripe ensures the best flavor for eating fresh, cooking, and preserving.

Visit your garden often and watch for the fruit to turn from green to fully colored. Then leave them on the plant for five to eight days. Vine-ripened tomatoes have the best flavor for using fresh or preserving.

Check plants regularly and keep harvesting, so the plants continue to produce. This also reduces problems with insects and disease organisms attacking overripe or rotting fruit. Store mature, fully colored tomatoes in cool, 45-to-50-degree conditions with high humidity. They will last about seven to 14 days in these conditions.

When growing indeterminate tomatoes, you will notice the plants keep growing and producing more flowers and fruit until the frost kills the plant. Redirect the plant’s energy from sprouting new blossoms and fruit to ripening the fruit that is already on the plant. Prune off the stem tip of indeterminate tomatoes about a month before the average first fall frost in your area. This allows the existing flowers to develop into fruit and the existing fruit to mature before the end of the growing season.

Extend the harvest season with the help of floating row covers. These fabrics allow air, light, and water through, but trap heat around the plants. Protecting plants from the first few fall frosts often provides time for more tomatoes to ripen.

Sometimes you cannot protect plants from frost or hungry critters prevent you from leaving the tomatoes on the plant to fully ripen. You can pick any tomatoes that are starting to show color before the killing frost and finish ripening them indoors. The blossom end should be greenish white or starting to color up. Use blemished and cracked fruit right away since these do not store well.

Store green and under-ripe tomatoes in a cool 60-to-65-degree location to maximize their storage life. Set the tomatoes on heavy paper spread apart so they are not touching. Or wrap them individually in newspaper so the fruit do not make direct contact. This helps prevent rot spreading from one fruit to the next.

These tomatoes will ripen over the next few weeks. You can speed up the process by moving a few tomatoes to a bright, warm location a few days before they are needed.

Extend the tomato season next year by growing a Long Keeper. The flavor is not as good as vine-ripened fruit, but you can pick these before the first fall frost and enjoy garden tomatoes for up to three months.

And don’t let the rest of the green tomatoes go to waste. Use them for frying, chow chow, green salsa, and other tasty treats.

Keep harvesting and enjoying your garden-fresh tomatoes as long as your growing season allows. Then make space to store them a few weeks after the first fall frost.

Melinda Myers has written more than 20 gardening books, including the recently released Midwest Gardeners Handbook, 2nd Edition and Small Space Gardening. She hosts The Great Courses “How to Grow Anything” instant video and DVD series and the nationally syndicated Melinda’s Garden Moment TV & radio program. Myers is a columnist and contributing editor for Birds & Blooms magazine and her website is www.MelindaMyers.com.
SMALL SPACE GARDENING: Creative ways to enjoy pansies this fall

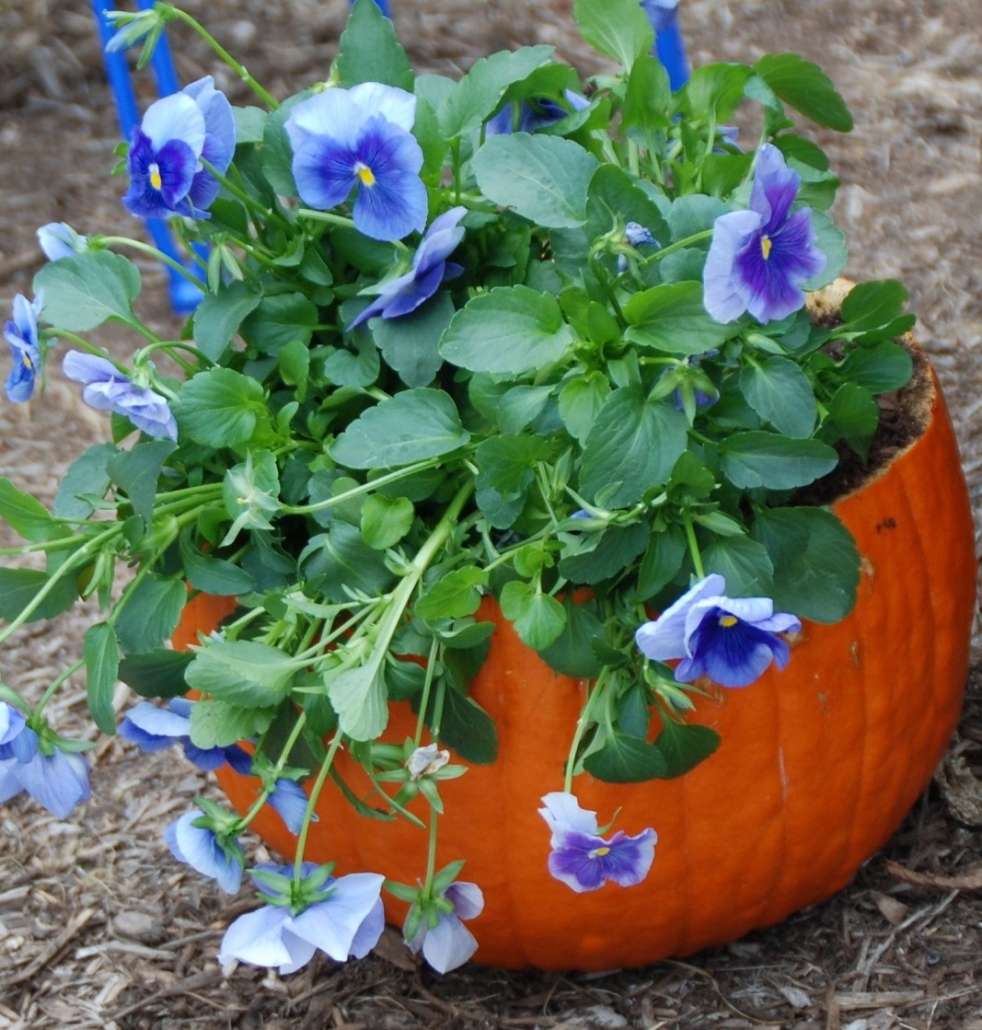
Scoop out the inside of a pumpkin, add some drainage holes, and plant some pansies for a festive fall planter. Photo courtesy of MelindaMyers.com

by Melinda Myers

Pansies have long been a fall and winter garden favorite. These cheery flowers are sure to brighten landscapes and containers and add a smile to any occasion. Look for fun and new ways to add them to your garden and fall celebrations.

You will find these cool weather favorites at your local garden center. Pansies thrive in the cooler temperatures of fall and during mild winters when your summer annuals fade or succumb to frost. They make great fillers in garden beds and containers or displayed in their own planter.

Cool Wave®, WonderFall and other trailing pansies are perfect for hanging baskets, as trailers in container gardens, or as edging plants in garden beds. You will need half as many of these pansy varieties to cover the same garden space.

Plant a basket of white trailing pansies, add some sunglasses and you have a ghost for Halloween. Scoop out the inside of a pumpkin, add some drainage holes and use it for a planter. Fill it with potting mix and you’ll have a biodegradable pot for the compost pile when finished. Or simply set a container of pansies inside your pumpkin pot.

Be sure to include a few favorite colors, fragrant varieties, and some All-America Selections winners. Ultima Morpho was the 2002 winner that was selected for its distinct blue and yellow flower design. Padparadja is a true orange pansy that is perfect for fall and Majestic Giants pansy, selected in 1966, can still be found for sale. Generations of gardeners have planted this large-flowered, traditional-faced pansy.

Include pansies in your fall meals and gatherings. Only use pansies and other edible flowers that have not been treated with pesticides. Be sure to let your guests know that the pansies are safe to eat, so they can enjoy this unique dining experience. Otherwise, you will find blossoms at the bottom of glasses or left on plates.

Pick a few flowers, remove the reproductive parts, and freeze them in ice cube trays to serve in your favorite beverage. Float a few of the flower ice cubes in your favorite punch.

Add a gourmet touch, some unique flavor, and color to your salads by topping a bed of greens with a few flowers. Continue the theme by decorating cookies or cakes with a few of your favorite pansies. The cheerful flowers will generate happy thoughts and for some, a way to enjoy the last of this season’s garden.

Brighten the start of school and your classroom while showing your favorite teacher a bit of appreciation. A do-it-yourself planter filled with cheery pansies is sure to elevate the mood of both students and teachers alike.

All you need are two yardsticks, a 4-inch x 4-inch wooden planter box, and a potted pansy and saucer that fit inside the planter box. Gather your glue gun and glue sticks, sandpaper, and a hobby knife to create your gift.

Cut the yardsticks into four-inch pieces and sand the cut edges smooth. Glue the yardstick pieces vertically and next to each other onto all four sides of the planter. Set the saucer in the bottom of the planter box and place the potted pansy on top of it.

Purchase plenty of pansies. You are sure to find other creative ways to utilize them this fall or simply use them as colorful fillers for voids in gardens and containers.

Melinda Myers has written more than 20 gardening books, including the recently released Midwest Gardener’s Handbook, 2nd Edition and Small Space Gardening. She hosts The Great Courses “How to Grow Anything” instant video and DVD series and the nationally syndicated Melinda’s Garden Moment TV & radio program. Myers is a columnist and contributing editor for Birds & Blooms magazine and her website is www.MelindaMyers.com.

SMALL SPACE GARDENING: Hot weather garden woes

by Melinda Myers

Poor flowering and misshapen or a lack of fruit on tomatoes, peppers and squash may be due to the weather, not your gardening skills. Temperature extremes can interfere with flowering and fruit set on these and other vegetables in your garden.

We watch for and can’t wait to taste that first red ripe tomato. It is certainly frustrating when we see flowers drop or the plant fails to form fruit. Tomatoes thrive in warm sunny conditions; but temperature extremes can prevent fruiting, cause misshapen fruit, or reduce the size of the harvest.

When daytime temperatures rise above 90°F and night temperatures remain above 70° F blossom drop and poor fruit development may occur. Combine this with low humidity and the pollen is not viable. In hot and humid conditions, the pollen is too sticky and doesn’t move from the male to the female part of the flower. Without pollination the flowers won’t be fertilized, and fruit will not develop.

Cool weather can result in poor fruiting. Night temperatures below the optimum of 59° to 68°F will reduce the amount and viability of pollen that the plant produces. Less viable pollen means fewer fruit will form. Cooler temperatures below 55°F can result in misshapen fruit and catfacing. Fortunately, the malformed fruit is still tasty and safe to eat.

Temperature extremes also impact pepper productivity. When temperatures climb to 95°F or higher the pollen is sterile and flowers may drop. Small fruit may also fall from the plant during such hot spells. Pepper plants also experience poor fruit set when night temperatures drop below 60°F or rise above 75° F.

Tomatoes and peppers aren’t the only vegetables impacted by temperature extremes. Eggplants, a close relative to tomatoes and peppers, do not set fruit until night temperatures are above 55°F. Beans stop flowering or the flowers die when temperatures rise above 85° F.

Flowering in squash and cucumber plants is also influenced by temperature and other environmental factors. These plants produce separate male and female flowers. The male flowers usually appear first and it is not until both the male and female flowers are present that pollination, fertilization and fruit production can occur.

Research found cool temperatures, bright sunlight, and shorter days encourage female flower production while male flowers are more prolific during warmer temperatures, less sunlight and close spacing. Flowering on squash and cucumbers is also impacted by nitrogen fertilization. Too much can prevent female flower formation while insufficient amounts can reduce the number of male flowers.

The simplest solution is to wait for optimum temperatures and the proper humidity levels to return. Once this happens, the plants will begin producing fruit.

If poor productivity related to the weather is a yearly problem, consider planting more heat tolerant varieties, adjust planting times and look for more suitable growing locations.

When the harvest is delayed, extend the season with the help of row covers. These fabrics allow sunlight, air, and water through while trapping heat around the plants. Just loosely cover plants and anchor the edges with stones, boards, or landscape stapes when frost is in the forecast. You can leave the fabric in place for the remainder of the year. Just lift it to harvest and secure the fabric when done.

If this summer’s weather leaves you disappointed with the harvest, remember there is always next year.

Melinda Myers has written more than 20 gardening books, including the recently released Midwest Gardener’s Handbook, 2nd Edition and Small Space Gardening. She hosts The Great Courses “How to Grow Anything” DVD instant video series and the nationally syndicated Melinda’s Garden Moment TV & radio program. Myers is a columnist and contributing editor for Birds & Blooms magazine and her website is www.MelindaMyers.com.
SMALL SPACE GARDENING: Enjoy your garden after dark with landscape lighting

by Melinda Myers

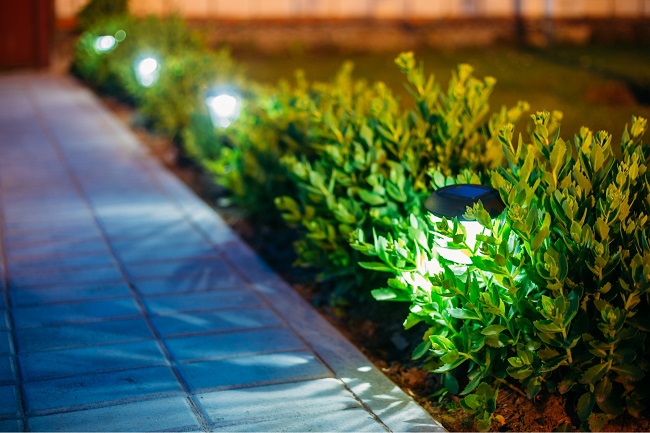
Enjoy your garden and landscape once the sun sets with strategically placed and attractive landscape lighting. Select the best type of light that complements your garden design and best accomplishes the intended purpose.

Solar powered lighting eliminates the need for outdoor outlets, extension cords or buried low voltage lines. The solar panels charge during sunny days and can be mounted on the light or on a long cord, allowing you to place the solar panel where it gets the most sunlight. Some lights turn on automatically at dusk, others have a manual on-off switch, and a few have a remote on-off control.

Votive and pillar candles are longtime favorites. Set them in a container on the table or line a pathway. Unfortunately, the wax does drip, there is a danger of fire, and the flame can blow out in a strong breeze.

Consider using battery-operated candles instead. These look and flicker like the real thing and eliminate some of the problems and dangers of candles. Look for those with remote controls or timers to make lighting your space hassle-free.

Use these battery-operated candles in decorative holders like the Dahlia Blossom Punched Metal Lanterns (gardeners.com). You’ll enjoy the copper cut lanterns as garden art by day and the intricate light pattern they cast at night.

Pot up your favorite flowers and tropical and edible plants in solar illuminated planters. Luminous solar-powered planters are frosted white by day and can be programmed to display one color or set for color-changing mode. These pots have a ten-foot cord, allowing you to place the pots where the plants will thrive and connecting it to its solar panel in a sunny spot nearby.

Solar torch lights have flickering lights that create a realistic look while lighting a pathway or sitting area. Use one to highlight a special spot in your garden or several to light a pathway, patio or larger space when entertaining.

Prevent trips and falls while also boosting safe access to your favorite outdoor spaces by lighting steps as well as pathways. Look for solar powered lights like Maxsa Solar Ninja Stars that can be mounted on steps, the ground, deck, wall, or other flat surfaces. The integrated solar panels come with a rechargeable battery.

Add overhead glow to patios, decks, or balconies with string lights. They come in a variety of styles to light up larger spaces or highlight your favorite tree. Multicolored waterdrop string lights will add a festive look to any space. Luminites® Solar String Lights feature Edison bulbs that provide six to eight hours of steady or gently flashing modes.

Add some fun, personality or added interest with specialty lights. Outdoor lights like the Twinklelite™ Solar Stake Lights have flexible branches covered with 120 LED bulbs. Twist and bend the branches to accomplish the look you desire. Then wait for the lights to turn on automatically at dusk.

Add some landscape lighting to help you enjoy quiet moments or festive gatherings in your gardens after dark. Select the best lighting options that are easy to use, complement your design and provide the needed lighting in your landscape.

Melinda Myers is the author of more than 20 gardening books, and contributing editor for Birds & Blooms magazine and was commissioned by Gardener’s Supply for her expertise to write this article. Her web site is www.MelindaMyers.com.

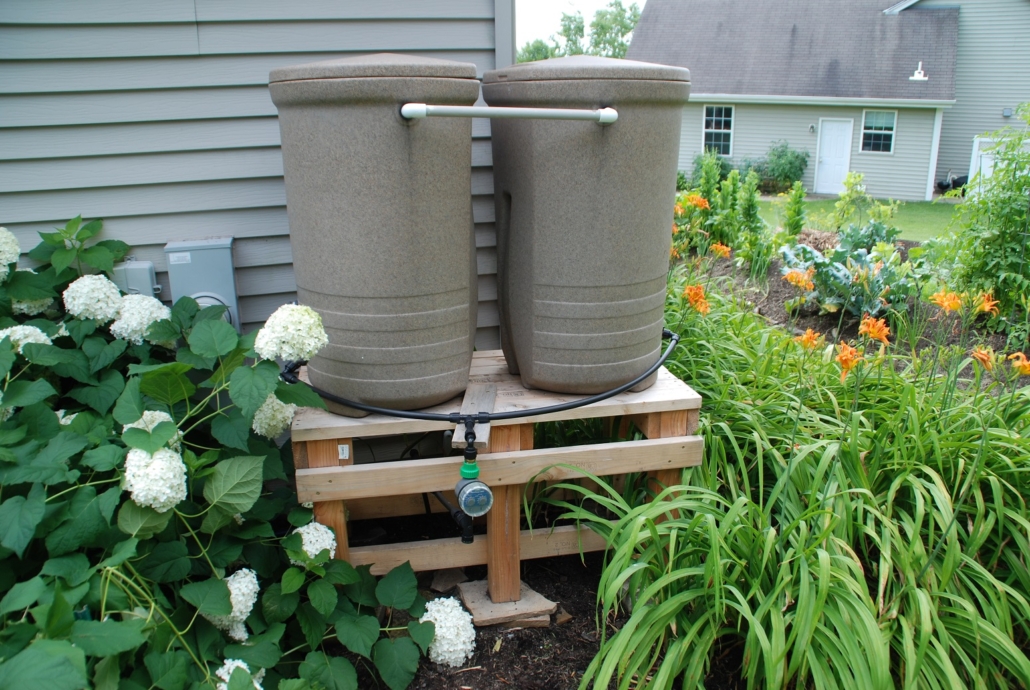
SMALL SPACE GARDENING: Use rain barrels to capture rainwater

by Melinda Myers

Put rainwater to use in your landscape with the help of rain barrels. This centuries old technique allows you to capture rainfall to use for watering ornamental gardens and containers.

Always start with a call to your local municipality. Some have restrictions on water harvesting, but most encourage this practice and some even offer rebates or rain barrels at a discounted rate.

Purchase a rain barrel or make your own from a large, recycled food grade container. In either case, there are some features to consider when purchasing, creating, and adding a rain barrel to your landscape.

Make sure the top is covered to keep out bugs and debris. Some come equipped with a solid lid with an opening just big enough to accommodate the downspout. Others use a screen to keep out debris, while letting in the rain.

Don’t worry about mosquitoes breeding inside your rain barrel. Just use an organic mosquito control like Mosquito Dunks and Mosquito Bits (Summit­ResponsibleSolutions.com) in rain barrels and other water features. Mosquito Bits quickly knock down the mosquito larval population, while Mosquito Dunks provide 30 days of control. They are both safe for people, pets, fish, wildlife and beneficial insects.

Look for one with the spigot near the base of the barrel so water does not stagnate in the bottom. Use the spigot to fill watering cans or attach a hose for watering.

Include an overflow outlet near the top of the barrel to direct excess water away from the house or for connecting adjacent barrels. A downspout diverter is another way to manage rain barrel overflows. When the rain barrels are full, this device diverts the water back to the downspout where it is carried away from your home’s foundation.

Elevate your rain barrel on cement blocks, decorative stands, or similar supports. This provides easier access to the spigot for filling containers and speeds water flow with the help of gravity. A water pump will boost water pressure for a nice steady flow of water.

Dress up your container with a bit of paint suited for outdoor use on plastic surfaces. And don’t worry if you are not an artist, you can hide your rain barrels with some decorative screens or plantings or upright shrubs, perennials or ornamental grasses. Just make sure you have easy access to the spout for retrieving water.

Start your conversion to rain barrels one downspout at a time. You can capture as much as 623 gallons of water from 1,000 square feet of roof in a one-inch rainfall. This can be a lot to manage when first adjusting to this change of habit. Disconnecting one downspout at a time allows you to successfully match the use of rain barrels and other rain harvesting techniques to your gardening style and schedule.

The choices are many, making it easy for you to conserve water and grow a beautiful landscape.

Melinda Myers has written more than 20 gardening books, including The Midwest Gardener’s Handbook, 2nd Edition and Small Space Gardening. She hosts The Great Courses “How to Grow Anything” DVD series and the nationally-syndicated Melinda’s Garden Moment TV & radio program. Myers is a columnist and contributing editor for Birds & Blooms magazine and was commissioned by Summit for her expertise to write this article. Her website is www.MelindaMyers.com.
SMALL SPACE GARDENING: Enlist nature’s help for managing garden pests

by Melinda Myers

Put away the harsh chemicals and work in concert with nature to manage pests in the garden. Create an inviting habitat for nature’s pest controllers to enlist their help with your gardening efforts.

Lady beetles, praying mantis and other beneficial insects feed on damaging pests like aphids. Just tolerate a bit of damage and wait for the good guys to move in and clean up the problem.

Grow a few plants to attract these and other beneficial insects to your landscape. Dill and its relatives attract parasitic wasps, coreopsis brings in the aphid-eating lacewings, and milkweed attracts lady beetles as well as monarch and other butterflies. Add some hyssop to attract the pirate bugs that eat thrips, spider mites and leafhoppers. Then plant members of the aster family to attract spiders that eat a variety of insects.

Invite songbirds into your gardens. They add motion and color to the landscape and help manage garden pests. Most songbirds eat a combination of fruits, berries, seeds, and insects. Their diet varies with the season. During spring and summer, they eat lots of insects and spiders when they are plentiful, easy to catch and an important part of their hatchlings’ diet.

A birdbath will help attract them and beneficial insects to the garden. Select one with sloping sides for easy access to the water. Add a few seed producing flowers like black-eyed Susans, coneflowers, salvia, coreopsis and more. If space allows, include a few berry producing shrubs like dogwoods and evergreens for shelter.

Leave some leaf litter under trees and shrubs and in the garden for toads that dine on slugs and other insects. Include a shallow pond or water feature. Even a shallow saucer filled with chlorine-free water is effective. Place rocks in and around the water for added toad appeal. Purchase or make your own toad abode from a ceramic or clay pot. Place it in a shady location near a garden filled with protein-rich insects. Set it directly on the soil and elevate one side with stones or use a cracked or broken pot that provides an entryway for the toad.

If you can’t wait for nature’s help, look for more eco-friendly options. Knock aphids and mites off plants with a strong blast of water. Trap slugs with shallow cans filled with beer. Trap and kill aphids in yellow bowls filled with soapy water.

Use barriers of floating row covers to keep pests like cabbage worms, Japanese beetles and bean beetles off plants that don’t need bees for pollination. These fabrics let air, light and water through so just loosely cover the plants at planting, anchor the edges and allow the plants to support the fabric.

Use these fabrics to help manage squash vine borer and squash bugs. Cover squash plants at planting. Remove the fabric as soon as the plants begin flowering for bees to pollinate the flowers. Only use this method if these pests were not a problem in this area of the garden the previous growing season.

Remove and destroy, smash, or prune out pest-infested stems as they are found. Enlist the help of young gardeners. Teach them the difference between the good and bad bugs in the garden. Then show them how to pluck, drop and stomp the plant-damaging pests. They’ll burn off some excess energy while helping maintain your garden.

If you decide to intervene with a chemical control, look for the most eco-friendly option on the market. Always read and follow label directions as these chemicals are designed to kill insects and if misapplied can harm beneficial insects as well.

Melinda Myers has written more than 20 gardening books, including The Midwest Gardener’s Handbook, 2nd Edition and Small Space Gardening. She hosts The Great Courses “How to Grow Anything” DVD series and the nationally-syndicated Melinda’s Garden Moment TV & radio program. Myers is a columnist and contributing editor for Birds & Blooms magazine and was commissioned by Summit for her expertise to write this article. Her website is www.MelindaMyers.com.
SMALL SPACE GARDENING: Start this year’s garden with a soil test

by Melinda Myers

Growing a beautiful landscape starts with the soil under your feet. The best place to start building a healthy soil foundation is with a soil test. The results will tell you what type and how much, if any, fertilizer is needed for the plants you are growing. Using the right type and amount of fertilizer is also good for your budget and the environment.

Test the soil when starting a new garden or one that is struggling. Since soil and fertilization practices vary greatly, collect and submit separate samples for each garden bed or landscape area to be tested. Repeat every four or five years to check on your garden maintenance.

You can take a soil test anytime the ground is not frozen and you have not recently fertilized. Early spring and fall are good times since you can make needed changes when preparing your garden.

Contact your local Extension service for details on submitting a sample. If they don’t have a soil testing lab, they will likely recommend a state certified lab that tests home lawn and garden soils, or you can search the internet for a certified lab near you.

Taking a soil test sample is simple. Use a clean trowel and bucket to gather a soil sample.

Slide away any mulch or debris on the soil surface. Use a trowel and remove a slice of soil that is four to six inches deep and right where the plant roots grow.

Take several samples throughout the garden you want to test. Collect samples from each edge and several throughout the middle of the bed. Mix them together and place about a cup of the soil in a plastic bag or the one provided by the lab. Be sure to complete and include the submission form. This includes a place to list the types of plants that will be grown in the area being sampled. The lab uses this and test results to make the fertilization recommendations. Send the sample and form together to the soil testing lab.

Allow several weeks for the test to be completed and the results to be returned. Most basic soil tests report the amount of phosphorus and potassium in the soil. Phosphorus promotes flowering, fruiting, and root development. Potassium promotes drought tolerance, disease resistance and hardiness. Many soils are high to excessive in these plant nutrients. You cannot remove the excess but should avoid adding to the problem. Soil test reports can help you do just that.

Most labs do not measure the amount of nitrogen in the soil since the levels change quickly and are not easy to test accurately. Instead, they make nitrogen recommendations based on the plants you are or will grow in the area being tested.

Soil pH is also measured in most soil tests. Acidic soils with pH below neutral (7.0) are often referred to as sour, while alkaline soils with a pH above 7.0 are called sweet.  Soil pH influences which nutrients in the soil are available for the plants to absorb and utilize for growth. Blueberries, azaleas, and red maples are examples of acid-loving plants. Clematis, crabapples and spireas are a few of the alkaline tolerant plants.

Always use soil test results when trying to change the pH. Lime is used to sweeten soils while sulfur is often used to lower pH. Using too much or the wrong amendment can negatively impact the health and productivity of your garden. Undoing misapplications can take years to correct. Growing plants suited to the soil pH may be the best solution for those with acceptable, although not ideal, soil pH.

Include soil testing when planning new gardens or helping those that are struggling. Understanding your soil can help you create a strong foundation important to the health, longevity and beauty of your gardens and landscapes.

Melinda Myers has written more than 20 gardening books, including The Midwest Gardener’s Handbook, 2nd Edition and Small Space Gardening. She hosts The Great Courses “How to Grow Anything” DVD series and the nationally-syndicated Melinda’s Garden Moment TV & radio program. Myers is a columnist and contributing editor for Birds & Blooms magazine and was commissioned by Summit for her expertise to write this article. Her website is www.MelindaMyers.com.
SMALL SPACE GARDENING: Always room for strawberries

Delizz® is a day-neutral strawberry that was the first ever strawberry to be selected as an All-America Selections winner. (photo courtesy of MelindaMyers.com)

by Melinda Myers

As you plan this year’s garden, be sure to include some strawberries. They are low in calories, high in vitamin C and antioxidants, and provide seasonal interest in gardens and containers.

Best of all, you don’t need much space to grow this delicious fruit. There are three types of strawberries: June or spring bearing, everbearing, and day neutral. Select the best type of strawberry for your space and harvest needs.

June-bearing strawberries produce one crop of berries in late spring to early summer, depending on where you garden. They produce the largest harvest but in the shortest span of time. Plant now and enjoy an abundant harvest next year.

Everbearing strawberries usually produce two crops of berries each year. You’ll enjoy fresh strawberries early and late in the season, while day-neutral plants produce berries throughout the growing season.

Delizz®, a day-neutral strawberry, was the first ever strawberry to be selected as an All-America Selections Winner. Just like the flower and vegetable winners, it was tested nationally and selected for its performance for the home garden. This 2016 winner is a compact plant perfect for hanging baskets, containers or garden beds. It can be started from seed or transplants and will produce sweet fruit the first year and all season long, even during hot weather.

Up the ornamental appeal of traditional in-ground plantings with a star shaped or tiered bed. The elevated beds make for easier planting, weeding, and harvesting. You’ll find a variety of tiered shaped beds to purchase or plans to make your own.

Use strawberries as a groundcover in sunny well-drained locations for an abundant harvest. Their attractive leaves, white flowers, red fruit and brilliant red fall color add sparkle to the landscape and provide fresh fruit for your meals.

Or grow them in a container, window box or hanging basket on your porch, balcony, or deck. They’ll be close at hand and easy to harvest.

Mix a few everbearing or day-neutral strawberries in with flowers to create an edible and ornamental planter. The harvest will be smaller when grown in a mixed container, but the flowers, fruit and fall color add ornamental appeal and the fruit will be a welcome treat.

Boost the harvest by growing strawberries in their own container. Fill a hanging basket and watch as the runners cascade over the edge for added ornamental appeal.

Try filling a traditional strawberry pot – container with planting hole openings on the top and sides – with plants that produce several harvests and remove the runners as needed. Keep all the plants from top to bottom looking their best with this DIY watering device. Place soil on the bottom of the container. Set a couple of perforated PVC down through the planter. Slide the plants through the hole from the inside of the pot. Fill the remaining space with soil. Gently tamp and water thoroughly to eliminate air pockets. As you water, the water travels through the pipe and out the holes, providing moisture to all plants from top to bottom.

Check containers daily and water thoroughly and often enough to keep the soil slightly moist. Reduce maintenance and increase success by incorporating a low nitrogen slow-release fertilizer into the soil at planting or sprinkle over the soil surface as needed. This type of fertilizer promotes growth without interfering with flowering and fruit production.

Start now identifying spaces to add strawberries to your landscape, deck and balcony. Then order seeds or plants early for the greatest selection. Before you know it, you’ll be enjoying garden fresh strawberries in your morning cereal, salads or as a snack at the end of the day.

Melinda Myers has written more than 20 gardening books, including The Midwest Gardener’s Handbook and Small Space Gardening. She hosts The Great Courses “How to Grow Anything” DVD series and the nationally-syndicated Melinda’s Garden Moment TV & radio program. Myers is a columnist and contributing editor for Birds & Blooms magazine. Her website is www.melindamyers.com.